Posts

Showing posts from 2016

30 in 30 Challenge starts in January

Leslie Saeta does this in January and September - please consider joining this year as it will definitely pay dividends no matter how much you paint or how many paintings you get competed.  If you have time as a constraint, just do a little drawing, doodle or zendoodle daily and you will still come away better for the time spent.   Leslie writes:  I am hosting another Thirty Paintings in Thirty Days Challenge and I wanted to personally invite you to join me! The Challenge takes place in January so it is time to sign up and get prepared! Please feel free to go to the 30 Paintings in 30 Days website at  https://www.saetastudio.com/30-in-30.html   for instructions as to what you need to do to participate in the Challenge. The website clearly explains that you need to photograph   your painting starting on January 1 and each day afterward. Then upload your photo (with a link to your blog or website) on the 30 in 30 blog at  https://www.saetastudio.com/30-in-30-blog . (Both of thes
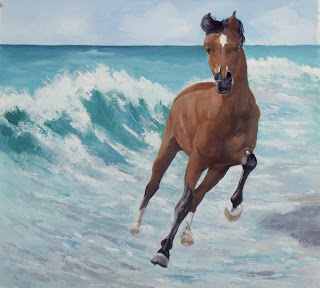
Wave Runner

Image
MERRY CHRISTMAS!!!!  Wave Runner                                                                            24"x24"                                                                            Acrylic Wishing the happiest of holidays for you and your families.  Thank you for stopping by to visit this year - it is much appreciated. This also is in memory of a wonderful artist, horse lover and photographer who lost her battle earlier this month,  Janina Suuronen.   Janina just loved horses and especially caught those in action. This is a combination of two photos from PMP by Kerri Dixon (wave) and Donna Sommers (horse).  I did the water with a new technique for me, "slop and smooth/swish" (yes that is a very technical term) and was done with a palette knife.  I really like how it came out, nice and loose and water going every direction as it does naturally in the surf.  I did this larger size as I have a frame with an ancient print of Monet's lilly po

Christmas Angel II

Image
                                      Christmas Angel II                                                9"x12"                                                Pastel Well some of this second attempt at using a grisaille as an underpainting was successful, but other parts of it wasn't.  I was attracted to this picture because I really liked the coloring.   It gave me an excellent opportunity to use lots of lavenders and fuchsias, the fuchsias rarely coming out of the box. The background is pan pastels.  This is on Art Spectrum sanded paper and as it has been a while since I worked on sanded papers I forgot how much less dust there is. Anyway, the unsuccessful part of this I think is the likeness.  I aged her and I am not sure what I did other than maybe the face is too long in mine?  I am not real happy either with the chin areas - What do you think folks.  What should I have done differently? I did find this was a difficult head position because with a child's

Christmas Angel

Image
                                                                 Christmas Angel                                                                         8"x12"                                                                         Pastel Well I think this was a successful experiment.  I put this image in extra large so you could see the texture that is on this face.  Remember I started with the 4-tone gray grisaille underpainting and then put the color on the top. Still so surprised at how clean the colors could be on top of those four shades that made up the base coat.  Many thanks to Hannah Davies for this excellent reference photo.  I just seem to have a weakness for these blue eyed, curly blonde hair types!! Since I used no finger or tortillion blending, just used other pastels of varying degrees of softness, sides and ends, you can see some of the grays showing through along with the top colors' burnished texture but still he retains the softness that is all c

Christmas Angel WIP

Image
Thought  that I would do another work in progress as I am trying out some new things and thought you might be interested in following along.  I am smart however, while trying a new technique I am back to using MiTientes paper and not trying to fight a new support feel as well. First off I have never tried to do a pastel     grisaille.  I guess I always thought that it would get muddy due to the grays underneath.  I am back to studying again and read that with pastels you already have grays involved just using any stick that isn't the pure color - if it is a tint of the pure color white has been added and if it is a shade of the original color then black has been added.  You can see that I was working with pretty light grays because this child has pretty white/reddish skin tones.  I used a red-brown for parts of the undercoat for the hair because this child is one of those curly blondes I just fall in love with.   But in some ways I am working like the old masters only thi

Yellowstone

Image
                                                                  Yellowstone                                                                     16"x12"                                                                      Pastel When I think of Yellowstone National Park I think buffalo and the geysers.  So this is a combination of photos from PMP, Ann Campbell and funky dragon.  I combined the geyser and added some buffalos into the picture so there would be some type of life - other than tourists. It also is another experiment with a new support, Pastel Premier paper from handbook paper company.  It is supposed to be "Wallis-like" as they were supposed to have supplied Wallis her paper.  Since I never tried any of it I can't be sure but it is a different type of support.  To me the surface is pretty hard.  I really don't think the pans performed as well on this as they are pretty sheer and I couldn't really get deep color so the colors in the po

The Perch

Image
I got several comments on the bird so I tried to do a little more to make him stand out just a bit more.   the top pic is revised and the lower is what I had previously.  Also shot the top pic in the sunlight so you can see more of the color.Added more darks and lightened the background around him.  since the name is the perch, I think we should be able to pick him out better. Your thoughts are appreciated.

The Perch

Image
                                                                    The Perch                                                                      16"x12"                                                                       Pastel Ok, I am giving up, throwing in the towel and going to just go with the details.  I just don't have it in me to be impressionistic and loose I guess.  Working again with the pan pastel colors that I have, but my additional ones have arrived and I will have more choices going forward!!  I am pretty amazed that the applicator does really work well and can be utilized in many positions with good result. This machinery picture is from Trevor Reeves, on FB's Photos for Artists, and the bird came from Debra Underwood at PMP.  I really like the hard abstract shapes of the machinery against the reality and softness of the bird, the diagonal, the textured background against the smooth rusted metals and the shadows. The birds in our yard con

Driving Here

Image
Driving Here 7"x11" Pastel This is a picture, from Ro Lovelock of PMP, of her grandson Will.  I have done Will previously in Wave Runner.  I really cropped this picture down so I could get him framed by the steering wheel and he ended  up in the right spot of the rule of thirds. This is my first work using the pan pastels.  I only have such a few colors but could use what I had (burnt sienna, white, black, yellow) in this picture.  They go on so sheer and working with the applicator wasn't as difficult as I thought it would be.  And they sure kick up a lot less dust.  The really beautiful thing was I applied the black steering wheel over the light face and the black didn't bleed or migrate.  So, going forward I think I'll love using the dark colors and reds as they will stay in place and behave.  Everyone has to have a vice and I found another one, and quickly ordered some more colors and can't wait until they get there. While a lot of this is

Jim's View

Image
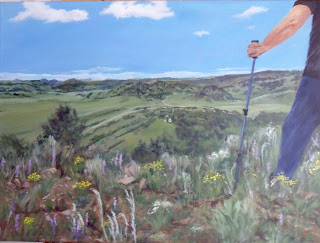
                                                                      Jim's View                                                                         24"x18"                                                                         Acrylic Just wanted to thank you, Val, Helen, Diane, and Hilda for taking a look and giving me input.  It is much appreciated ladies as I just get too close to it and I don't always see what is in front of me. Enough of the tweaking, dabbling, daubing, repainting and fussing, I just signed it and for me that says I think it is done.  I tried to get more green color in the right bottom corner and added a few more flowers which I think takes away that white look that I had going.  Got the sides and bottom finished so he won't have to frame.  I decided to leave the jeans the lighter color than in the ref picture because I wanted them to read jeans and his t-shirt to read black.  I am thinking that the weeds on the bottom centers

The Homestead Is it Finished?

Image
Well I have been away from this for a few days and did some color changes and tweaks this morning to see if I could give this a bit more punch.  But I think I am pretty much done.  Do  have too much white in the bottom right corner?  What do you guys think with your fresh eyes - is it ready to go?  I pretty much wanted to send this out this week to beat the Christmas rush and have to figure out how to pack the darn thing now.  I haven't mailed a picture this big.  I do know that John Stobart always put in acid free foam board in the back of the picture so it is protected from anything poking into it from behind.  I have a very tight fitting box that I am going to try but am afraid they will crush the corners - definitely will insure it this time. Thanks much for stopping by and leaving any c&c's, as always it is so much appreciated.

Fall

Image
                                                  HAPPY  THANKSGIVING ALL I am working on drawing individual,face features with pastel, But I seem to get easily bored.  When we travel I carry a cheap set of Marie's pastels.  They are really light pastel colors, not many darks.  I also grabbed a sketch book with white paper that I haven't used in many years.  As I thumbed through the pages I saw some beginning sketches of tree trunks and decided to do something that used my old beginnings and felt like Fall.  Since I didn't have dark brown I used a 6B pencil and tried a tip from pastelist Paul deMarrais on how he draws tree trunks/twigs.  Figured if it works for pastel sticks it would for pencils as well.  Just turn the pencil as you pull it over the paper.  There is no way you can draw a stiff straight line.  The whole picture is just made up and it was great fun just doing this little sketch. Thanks for stopping by and here are my eye sketches

The Homestead

Image
This is a picture I am doing for a friend.  while it isn't the most exciting picture it does really show the vastness of Colorado and the rolling hills.  My friend is standing on a hill that looks down onto his property and he is in process  of building the cutest "tiny house" that his wife designed.  So what I really wanted to feature is the wide open space of land and sky.  He says Colorado usually has the bluest skies so I just put the clouds over the ridge line.  As you can see I am starting to work on the foreground but before I go there I have to work on the tree masses below on the right-hand side.  I am planning on adding more flowers than what you are currently seeing in the reference.  But I am looking for a way to give it a bit more zap.  I do like how his arm is pointing to island and the small dots that are his car, shed and soon-to-be house. So guys I am looking for suggestions and if you see something that is out of whack for me to correct while I sti

Fire in the Sky

Image
                                                                 Fire in the Sky                                                                      12"x16"                                                                        Pastel Many thanks to Allankah of PMP who posted this sensational sky.  It was so much fun to use colors that I don't typically use, the reds, oranges and yellows.  I am back working more with pastels again and experimenting with new paper supports.  I think this pastel mat, my first go at it and if it is it definitely grabs the pastel layers but isn't as abrasive as the sanded papers I have previously tried.  I have some "Wallis" like paper that I was told is manufactured by the same folks who did her paper - so ... we'll see. I am working on a large acrylic and this gave me some relief from the precise work that I am trying to accomplish on that piece. Thanks much for taking a peek and stopping by. Saw this cartoon a

First Impression

Image
                                                                 First Impression                                                                        Acrylic                                                                        11"x14" I want to thank Li Newton for this stunning photo that I just knew I had to try when I saw it.  She called it Watching.  Again I wanted try to infuse this photo with some feeling and I hope my thought came through.  Here's what I thought, that as he boldly looked back at me, that we were evaluating each other, creating a first impression.  They say you make a decision on a person within 7 seconds - but many times the first impression isn't the correct one (yep I have learned that one the hard way).  As I look at this man he could be ages old or a current day person you would pass on the street.  He cold be everything from a professor, preacher or unemployed.  Initially I thought about calling this Warrior because I can see tha

Metamorphosis - Avery

Image
                                                            Metamorphosis - Avery                                                                     24"x19"                                                                      Pastel Avery is the daughter of a friend of mine.  Many thanks to Carey and her friend, the photographer who took several wonderful shots of Avery.  Carey was kind enough to allow me to try to capture her.  I changed up the photo a bit by reversing the image and changed out the background and hat to lighter colors. I kind of think of this as the culmination of my 30 day challenge work with the mugshots and feel pretty good about catching her.  I did try a quick sketch of her on Day 5 and didn't think I caught her at all.  I have to say that for one time the picture is so much better than this shot indicates. You might ask why the title?  Well Avery is 14 and has quite an athletic personality.  I feel that these shots caught her as she is m

Tied Up

Image
                                                                       Tied Up                                                                        18"x12"                                                                         Pastel Well had a bit of a let down I think after finishing my last picture and have gone several days without the desire or energy to get back to work.  Pretty back when I'd rather clean or do garden closing work.  I do have a portrait in process, but want to be sure I have enthusiasm and energy when I work on it. So today I finally got geared up to try a real landscape with sky and water, the double whammy.  I like the sky, the bottom part of the picture is suspect at best.  Anyway, it is a start and I will continue to try and try again. This is on Artagain paper.  Thought I'd try to do paper until I get my feel back a bit and then try out some of the Pastel board that I got.  I am surprised at how many layers the Artagain will tak

Rue de Petit Champlain

Image
                                                            Rue de Petite Champlain                                                                        Acrylic                                                                        18"x18" Think I am going to call this one finished.  Been fussing on it so that must mean it is time to stop.   If it was looser don't think I would be so darn worrying about details.  Of course it will stay out for a bit and I still have some of the sides that I have to finish, but this is it. Think  will pair it with the Auberge du Tresor painting and put them up together.  Have a few more Canada shots to try as well, but time to switch subjects for a bit. Lots of stuff going on in this picture and hope that it all works.  Some of it is per the reference and others I took a little literary license.  Think that my blobs turned out ok for people.  Not sure if I diminished them in size too quickly, will have to do some more studying on

Rue de Petit Champlain WIP

Image
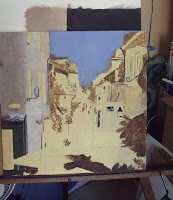
Well going to post this early because we are having some really nice weather and it is time to get out onto the porch and just enjoy it.  Thankfully, we were too far from the hurricane to have any rain or big winds, mainly just clouds and smaller consistent wind.  However, the hurricane, they fascinate me, since we lived so many years in Florida, each was different.  Today, it is crystalline blue skies and her to believe there ever was a monster storm a couple hundred miles to our east.  But we have 30-40 mpg winds and gusts because we are on the back side of the hurricane.  So strange. I got to work on this for a few hours this morning and am now am finishing adding in the rest of the base coats.   Also started to add in the secondary coats and putting in some of the details.  Once all the colors are down and canvas covered then I will have to rework the shadows.  I am most afraid of trying to do the crowd, which is in the center of picture, so you can kind of see I am working

Rue de Petit Champlain WIP

Image
I have been busy this week shutting down the garden, yessss!!  I always look forward to it when it begins in the Spring, but by Fall, I am tired of weeding, trimming, cutting plants, did I say cutting plants, cutting plants??  This year I cheated and had it done by someone else one time to get it back to down levels that I could work on, not having to climb a ladder as I value my old limbs.  Going to do that at least once or twice a year as it makes it so much easier.  I sure enjoy it when I can sit with my glass of wine on the porch, but have a hate relationship when I am sweating my derriere off (sigh I wish I could sweat it off) Why I went into the above is usually after a couple of hours I am feeling the manual labor so not in the mood to paint.  But something about this picture is spurring me forward and I feel like it is coming together - at least at the base coat level. I don't know what exactly, but something has changed in my mind and it is reflected in my painting.

Rue du Petit Champlain WIP

Image
  OK, I am at it again and am working on a cityscape, the reference picture I took back in 2003 - that was before digital cameras in my world.  So I scanned in the print into my computer using my printer and am taking it from there.  This was taken in early Fall in old town Quebec City and as you can see no cars allowed on this street.  It just looked so European.  I knew when I was coming down the Breakneck stairs that one day I wanted to paint this scene.  I remember the brisk air, the noisy crowd, all the activity, color and sign pollution - and I just loved it.  But it is a pretty intimidating picture, so just keep telling myself to do one layer at a time and trying to keep it loose - yeah right!!  Technically I guess you can paint a building loose and certainly the windows will be looser and of course the people and other things as we move back into the planes will get more abstract and hopefully single strokes.  I underpainted with a light yellow ochre to enhance

Auberge du Tresor

Image
Auberge du Tresor 16"x12" Acrylic Well finally I am going to call it done,  unless someone has some suggestion for improvement.  I am pretty happy with this as I said before as I think I caught the essence without trying to put in all the details (something that is a challenge for me).  I put up the original reference photo - how do you think I did at capturing the scene.  I always love your feedback as it usually makes me stop and think. I always do a bit more studying when I am working on challenges and some of interesting the things I came across is that you should try to work in a series.  So I am going to give that a try and have selected a couple more of my photos from our Canadian trips that I am going to try to paint.  I want to go ahead and try to stay in this looser style and definitely experiment with the underpainting colors.  Again I came across some pastel advice where you should put 3 different yellows and blues as the block in colors.   I do li

30 Day Challenge - Day 26 - Auberge du Tresor WIP

Image
Yes, this picture is coming along and while it is pretty complete there is still a lot of work to do.  I think many times I start to get anxious for the picture to be over at this point and stop at what I now realize is before completion.  However, to get a more finished end result there is still a long way to go just doing the small tweaks now.  One of the things that I am going to have to be sure is that I don't overwork the details here at the end.   While this picture tends more to the realistic side I still want to keep it looser. I went out and googled horse and buggies so I could find a better shot with a bit more details rather than just leave the dark blob that my photo shows.  I also googled Auberge du Tresor and got winter snow shots -- hmmm, might be another picture! I was watching a video by Will Kemp (one of my current favorites) and he talks about how at this stage of the painting he goes back and forth between working in color and thinking in black and white to

30 Day Challenge - Day 25 - Study of Woman

Image
Due to the circumstances I wasn't able to use the proportional dividers or a ruler and to be honest I really didn't spend a lot of time using the pencil to measure - I was pretty much just "eyeballing" it.  I started out just working on several nose positions and then decided I wanted to try to do a full face (get impatient I guess)  I started with just doing plane angles for the outside of the head dimensions.  Then rounded those out and when happy with the base drawing I started to shadow in the drawing.  This was started while waiting and finished while flying so it was a couple of hours work. For whatever reason I have to say that it was relatively easy to come together (even hubby, my biggest critic, thought I caught the likeness to the photo)  and I am going to check it with the proportional dividers, but am thinking that I pretty much got them in place.  I do think however, looking at this that her ear is pretty large as it merges into the shadow at the bot

30 Day Challenge -Day 24- Young Boy II

Image
Still working with the proportional divider and measured, marked, drew, and measured again.  Decided to try to do the young man again and see if I could get a better likeness and think, yes, even though I had to modernize his hair style a bit I got him.  He is definitely older as he should be with the longer face, still graphite on gray paper.  So on to working through the book and then I will try again to see if I can improve on him. Thanks for stopping by.

30 Day Challenge - Day 22- Young Boy

Image
Took a few days off and got to sit down a few minutes to work on another portrait.  Obviously this isn't a mug shot and this boy isn't any criminal.  He has a sweet expression.     This is the first portrait I have used the proportional dividers.  I think as I get into a better position to be sure I am in the same measuring spot each time it will improve.   This is graphite on gray paper.  I am going to mark this and then Work through Lee Hammond's book, Draw Real People, and see if I can get better at capturing the likeness.   Thanks for stopping by.

30 Day Challenge - Day 19 - Auberge du Tresor WIP

Image
The work on this picture continues.  You can see that I did go freehand now on the windows, but boy it stresses me out and makes me nervous.  Just not my thing I guess. Anyway I have a lot more of the foreground in now and will pretty much for the main portions have just the horse and the carriage to go - but oh, let's don't be forgetting the next challenge is the wheels and those eclipse shapes.  Oh, can't forget there is going to be a lightly leafed tree in there as well and good for me, it should cover some of my windows.  Of course too I will have to put the name on the sign in gold leaf - it is only what should be expected. This is giving me enough confidence that I probably will try some more landscape/cityscape type of pictures.  I have another down in the Lower town of Quebec, a street scene that I always wanted to do.  Maybe I will have a Quebec series heh?  I don't know, I have always shied away from landscapes thinking they just didn't work for me.

30 Day Challenge - Day 17 - Auberge du Tresor WIP

Image
Ok so I am deviating from the mugshots for a few days, but got to keep me sane and keep it interesting.  Interesting it is and I am excited about this picture for several reasons. 1)  First I have painted mostly on paper,  not canvas, and felt it was time to make the change as it simplifies framing issues and you can work larger.  Well, I got some deals when I went to the Goodwill store.  I always check for frames with mats or large size frames, but this time I got a bunch of decent sized canvases, 12x15" or larger for $1.91 apiece.  Yes, as you might recall I am cheap, cheap, cheap.  But I am just learning so recycled canvases seem ok to me.  What I did was sand this one down and then recoated with several coats of gesso with the last one being tinted with burnt sienna.  Yellow ochre, burnt umber and white and raw sienna and white are normally used depending on what is going on top.  I have also heard of people using red beneath as well. 2)  When I do these challenges, to gi

30 Day Challenge - Day 16 - Mugshot 16

Image
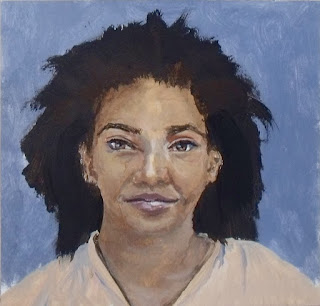
                                                           Mugshot 16   4"x4" Not sure how many more of these mugshots I will get done this month as I am now moving into the busy part of the month where I will have limited time and uploading issues.  So I am happy to say that I feel I am leaving on a higher note than when I began.  Of course, that is the object of doing these challenges, to focus and hope to see some improvement.  I have to admit it made me feel a bit weird using these folks given their situations, but I think I will continue to do them just to stay in practice.  You just can't imagine the unlimited expressions,  shapes, variety of hair colors/dos that you can find all in one place.  I think too once I get more comfortable I can throw caution to the winds and really have some fun with these. This lady exhibits a pretty common skin tone for many darker skinned Americans.  Her skin tones lean towards browns and yellows as opposed to the purples and b

30 Day Challenge - Day 15 - Mugshot 15

Image
                                                                Mugshot 15   4"x4" I chose this person as she had what I call "sallow" skin tones with the overall color reading as yellowish.  I also was kind to her in that she hadn't done her roots in quite a while and her hair was quite a brassy/blonde color (I tried to mix it and since I applied wet-into-wet it didn't really read but blended into the earlier base tones of the hair).  So I compensated and gave this a wilder background. I am trying now to not obsess so much on the techniques but try to capture the feeling and emotion of the person.  She looked to me like she was totally defeated.  Since these are mostly college kids I thought it was unusual that someone so young looked so down, but guess she had a rough day or night.  I have had a few folks with kind of pouty expressions and this mouth was set in an unusual way as well which I think added to her expression. Thanks much for stopping by

30 Day Challenge - Day 14 - Mugshot 9

Image
                                                                     Mugshot 9 - 4"x4" Well I have to admit that what drew me to this person is the hair (I am betting that it is bleached since I see the dark roots) and that square jaw.  Again this is colored pencil, but now I am on Bristol board so it could blend a bit smoother but I wanted to leave strokes apparent in this one.  Normally I am a blender but again when you look at a lot of successful artists they show strokes instead of having a totally smooth transition.  So this is my shot at that. Right now I started out working ahead and am maintaining that which is good as it really takes a lot of the pressure off.  I know I say this each time but the first week is almost on us and it has gone pretty good.  Not sure however that I am seeing lots of improvement but am trying lots of different colors.  I think I still have the eyes too dark so will need to experiment with finding other solutions for that but I do li

30 Day Challenge - Day 13 - Mugshot 13

Image
                                                                    Mugshot 13   4"x4" This is my try at hispanic skin and I think when I first started I had excellent light black skin tones down right; which of course is too dark for hispanic skin.  So I tried to add more yellow and some green to these tones.  Again I am looking at trying some different skin palettes and colors.  I tired to work like yesterday, in from the darkest outside, but wasn't as successful on this portrait as seems to me the lighting gave a lot of midtown es - not super darks or highlights. All colors are primarily being mixed right now with ultramarine blue, cad yellow lt, cad red, white and I threw in a bit of burnt sienna and some raw sienna so I could get something that either added a bit of yellows or reds. I am a little frustrated because on all these mugshots I am getting really close to a likeness but not getting the likeness.  Finally my proportional dividers are here and will see

30 ay Challenge - Day 12 - Mugshot 12

Image
                                                                  Mugshot 12  4"x4" Well today has different color receipts as well as how it is applied.  I started with the darkest colors and came in from the outside of the face to the lightest highlights.  I still think the colors I am using are too orange or too yellow.  But will continue to preserve.  I do like coming from the darkest to lightest colors, sort of in bands - this technique is designed to use with oils so that you can blend.  Since I am using regular acrylics I tend to get patchy effect.  I am about to clean my palette and put in new paper towels (to keep the acrylics moist) and am going to put in all interactive and then I will try just spraying to see if I can get a smoother blend. Thanks much for stopping by.

30 Day Challenge - Day 11 - Mugshot 11

Image
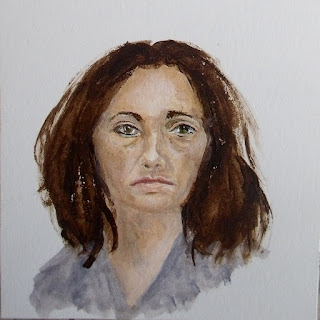
                                                            Mugshot 11   4"x4" You know some days it seems to come together and you think you got something and then it all goes away and it is like starting over.  Still was working with the premixed Sanden skin tones.  They seem to me however to get still pretty gray so back to the study books.  I have several books on portraits in oil and pastel and these colors seem so orange.  Will go over the colors used in those exercises to see if I can come up with what I think in my mind looks more normal.  Thankfully in a few weeks I will be able to love at the masters and see what colors their lustrous flesh tones are comprised of. This again is acrylic and I think in this mugshot I finally concentrated less on technique and picked up some of the despair that you got to feel being in this situation.  Only thing is I don't think I made her look as aged and worn as the photo. But maybe that is the right of the artist and what

30 Day Challenge - Day 14 - Mugshot 10

Image
                                                               Mugshot 10   4"x4" Ok in this mugshot I premixed colors for the mid and light flesh tones and for shadow and half tones. The halftones are primarily the grays that are his beard areas.  I then tried to mix from those basic flesh tones to get the others.  I am working on mixes on my color charts as well to see if I can find just the right colors that I want to move forward with. For whatever reason, maybe because I really went to a small brush I felt this has more control and details. Thanks much for stopping by and taking a look.

30 Day Challenge - Day 9 - Mugshot 8

Image
                                                                   Mugshot 8 4"x4" Since I am working on the porch, because we finally got some cooler weather, I am back to working with color pencil and this is still on Stonehenge.  Again you get the grainy look because I don't have my pencils as sharp as they should be. Anyway I saw this guy and he just looks so darn happy considering the circumstances.  Most of these mugshots are coming from the Athens, GA area.  I chose to go there because most of these folks are either DUI or committed some misdeamors, I don't want to do some hardcore criminal and around Atlanta, unfortunately, there are too many and they are way too young. As you can see I am still working on the best colors to get the skin tones I want.  I am not there yet, seems to be too brown, too gray or blatantly too red.  But that is the purpose of this trying to find the right tones and get them down right the first time. Thanks much for stopping

30 Day Challenge - Day 8 - Mugshot 7

Image
                                                                 Mugshot 7   4"x5' Ok, so now  have switched to pastel and decided to do this a little larger than some of the colored pencil pieces.  As I sort through these mugshots I am trying to find interesting low offenders and this girl certainly fit the bill.  Again she didn't look too upset that she was at the police station, oh well. This is on the Stonehenge paper and it takes the pastel very well, but again there is a grainy look using this paper. Thanks much for stopping by to take a look.

30 Day Challenge - Day 7 - Classic Ride

Image
                             Classic Ride                                9"x12"                                Pastel Well woman can't live with just doing mugshot portraits.  This was done for this weeks DPW challenge of autos.  I don't usually work from my own photos, as picture taking isn't my strong suit.  But this was the perfect opportunity to do this car that we saw the last time we were in the mountains at Lineville Falls, NC.  This was a bold car just shouting to be looked at and admired.  We did.   It had been lovingly restored, we think it was from the 1920's.  The owners were driving the Blue Ridge Parkway the way it was meant to be driven. I have been working on giving picture frame suggestions and since I sell mostly unframed, give an idea of what it would look like when finished with mat and farm.   What I would really love to do is to put the paintings in room settings, but haven't figured out how to do that yet.  I am sure th